


Protect Your Property from Coastal Moisture
Living in a coastal town like Gansbaai offers incredible views and fresh sea air, but it also exposes homes and buildings to high levels of moisture...
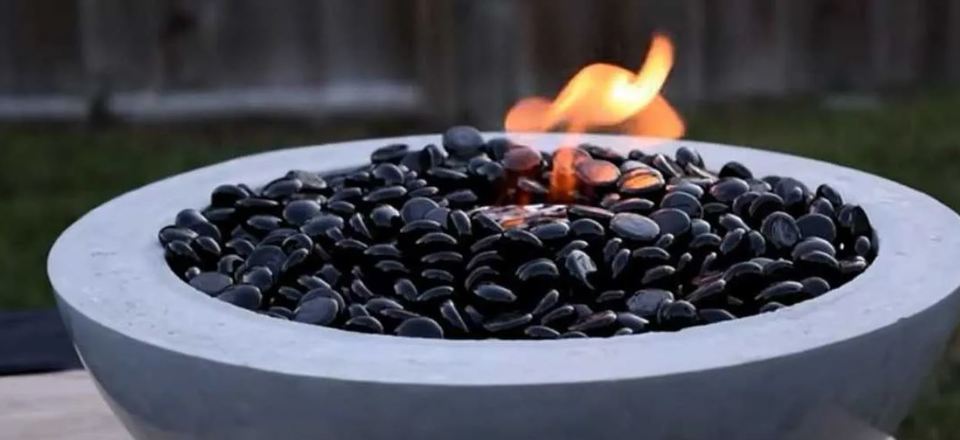
Today we are going to tell you how you can make your very own fire bowl with gel fuel, that will not only leave your guests amazed at your work of art but also just a bit jealous. This might just be what you are looking for to put on your patio table, you will not believe how fun and easy it is to make, so let’s begin.
• Gel fuel for the fire
• Black marbles or you can use Onyx black fire glass
• High-strength concrete mix
• 2 Disposable plastic bowls (1 x large and 1 x smaller)
• Wire mesh
• Tools and miscellaneous items
• Hand shovel
• Rubber mallet
• Palm sander/sheet sander
• Sandpaper 80 grit and 220 grit
• Oil (any oil will work)
• Weights or large rocks to hold the bowl in place
• Tin snips
Step 1
To start you can use two strong disposable plastic bowls, one of which must be smaller than the other so that you can pour the concrete into the larger bowl, and use the smaller one to create the indent.
Depending on the size of your bowl, we cannot give you the exact amount of concrete you would need for this project, so we would recommend that you start with just a small amount of concrete with the intention of adding more to the mix as you proceed.
Add water to the concrete mix, little by little, but do not overdo it. Turn the mixture over, making sure that you get it all wet, then add a bit more mix and water, to get the correct consistency of concrete. Not too wet and not too dry.
Step 2
Take the smaller bowl and cover the outside of the bowl with oil, you can even use motor oil, this helps with the release process, once you are ready to separate the two bowls. We did not add any oil to the large bowl because we did our mixing inside the bowl.
Insert the smaller bowl into the larger bowl with the concrete mix and force it down, till the surrounding concrete is raised to the desired height. You can now apply the weights to hold it in place, then using the palm sander, vibrate the form till you see air bubbles rising to the top.
There is no precise time limit to do this, just make sure that you do it as well as possible, this will ensure that you get a nice smooth form. You can also make use of the rubber mallet and hit the form a few times to get the stubborn bubbles out.
It takes 48 hours for the form to cure and will now be ready to be handled.
Step 3
The inner bowl can now be removed, it should come out pretty easy, and to remove the outer bowl, just pull away the edge, by going around the entire bowl. Place the bowl upside down and give it a couple of pats to release it, you will notice how smooth it is, with only a few scratches caused by the mixing, we will sand this down.
Tip: You could mix your cement in a separate bowl, then pour it into the bowl that you want to take the form, for a smoother finish if you wish.
Step 4
Sand the rough edges on the lip of the bowl with some 80-grit sandpaper and then you can use the 220-grit to smooth it out, to support the marbles.
Step 5
We used a construction wire mesh, and cut the mesh down with tin snips to match the outer lip of the bulb, then you can shape it to fit the inside. Remember to make sure that the mesh is not galvanised, the galvanised coating breaks down and makes toxic gasses when it is heated and is dangerous inside or outside!
Another way you could do it, is to cut out the area around the fuel can, so that the mesh does not heat up. Place your fuel can inside your concrete bowl, and secure the mesh over your bowl to make the wire mesh safer to handle, use a hammer to bend over all the strong points.
Final Step
Now for the fun part, place your stones over the top, and to finish it off, pour your gel fuel into the can.
Strike a match, and watch the flames fly!
We hope you enjoyed this fun project, we are confident that you will love the end results. All of the above materials and tools are available from your local Build it Gansbaai and Hermanus or you can order online from the comfort of your own home.
Gansbaai Build it Plus forms part of the fastest-growing hardware and building materials group in Southern Africa. The Build it name embraces all activity within the hardware and building industry and supplies quality building materials at the best possible prices for large and small-scale building ...
View ProfileXplorio is your local connection allowing you to find anything and everything about a town.
Read MoreLiving in a coastal town like Gansbaai offers incredible views and fresh sea air, but it also exposes homes and buildings to high levels of moisture...
Living in a coastal town like Gansbaai offers incredible views and fresh sea air, but it also exposes homes and buildings to high levels of moisture...
Living near the coast has many advantages, but it also creates unique challenges for maintaining your home.
Renovating your home is one of the best ways to increase property value, improve functionality, and refresh your living space.
Whether you’re tackling a small leak, installing a new bathroom, or upgrading your kitchen...
We provide a full range of construction and DIY supplies at competitive prices.


