


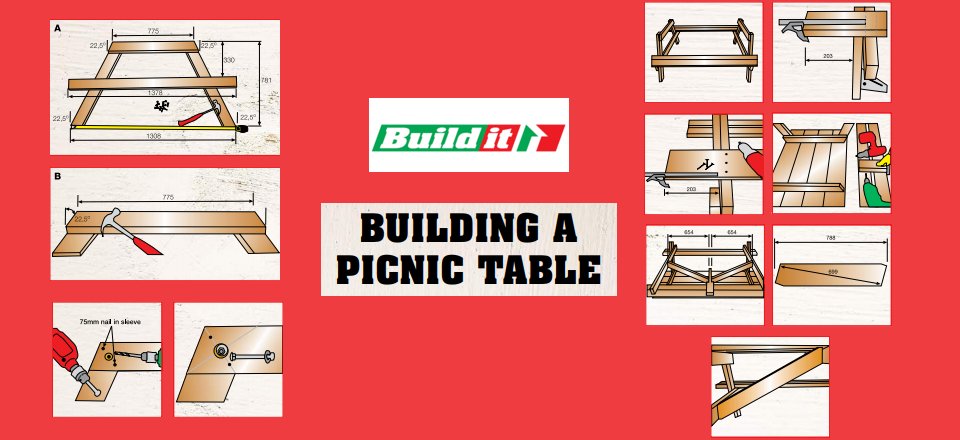
This simple, but sturdy picnic table can seat six adults and will provide years of service.
Tools Required: Drill, 8mm Bit, 25mm Spade Bit, Hammer, Screwdriver, Tape, Mitre Saw, Set Square & Clamps.
Material List:
- 10 x lengths, 50mm (thick) x 100mm (wide) x 1829mm (long) SA Pine
- 8 x lengths, 25mm(thick) x 100mm(wide) x 1829mm(long) SA Pine
- 4 x 8mm x 90mm carriage bolts and nuts with 20mm washers
- 38mm brass wood screws
- 63mm brass wood screws
A Frames
Step 1:
Select the 50mm x 100mm timber. Cut 4 legs to give a height of 781mm, with angles of 22,5˚ at each end as shown above. The actual length will be longer than 781mm. Laying the pieces on a floor and marking the dimensions will help.
Step 2:
Select 50mm x 100mm. Cut 2 top A frame braces at 775mm long, with angles of 22,5˚ at each end as shown.
Step 3:
As in pic A, select 50mm x 100mm timber and cut 2 lower seat cross braces at 1378mm long with square ends.
Step 4:
Assemble the two A Frames as per the dimensions as shown in Pic A. Do this by laying components on a flat floor and ensuring that all dimensions are correct. Use two 75mm screws or 75mm galvanised nails to fix all timber in place at each crossing point. The nails or screws must not be put in the centre at each crossing point. A bolt will go in each centre position.
- Drill four 25mm holes, 12mm deep using a 25mm spade bit. Push an 8mm x 76mm galvanized bolt through the hole and with 20mm washers and bolts, secure each point. Do the same to the other A Frame.
- Select 50mm x 100mm timber that is 1829mm long for the bench boards. Using 76mm brass wood screws, attach two of these lengths on each side of the protruding lower support brace of the A Frames to form the bench seating. Countersink all screw holes. Make sure that the lengths protrude 203mm beyond the support as shown, on each side. A ± 10mm gap should be between the two boards.
- Carefully stand the table on its legs. Select 8 pieces of 25 x 100mm wide boards and using 38mm brass wood screws, attach these boards to the top brace of the A Frame to form the table top surface. Countersink all screw holes. The boards must protrude 203mm on each side of the top brace as shown above. Use a square to make sure the top boards are square to the top brace. Note that the outside boards will protrude 12.5mm beyond the edges of the top brace.
- From the 50 x 100mm material, cut a single table top underside brace 800mm long with 22,5˚ angles on each end. Position and hold this brace in the centre of the table top using clamps. Fix it in position using 38mm brass wood screws, screwed through from the top surface. One screw per board. Countersink all holes. Turn the table over. Cut two seat braces from the 50 x 100mm material, 203mm long. Position and clamp these braces in the centre of each seat and then fix them in position using 63mm brass wood screws from the underside. Countersink all holes.
- From the 50 x 100mm material, cut two bottom angles braces to 788mm as shown. Cut two angles at 28˚ at each end. The distance between the two short corners should be 699mm. On each end tip of the angle cut, remove 13mm of the material as shown, cut 90° to the angle face.
- Fix these angled and notched angle braces to the underside of the table as shown. The brace fits between the A Frame bottom brace and the centre brace under the table top. Fix it in place using 63mm brass wood screws. The picnic bench table is now complete. After sanding and filling holes, apply a primer and paint in a colour of your choice.